The arduino, a proximity sensor and 7 segment led
A couple of weeks ago I got me the an ultrasonic range finder, but I hadn’t had time to play with it until today. Check out the code and circuit below.
What Does The Circuit Do?
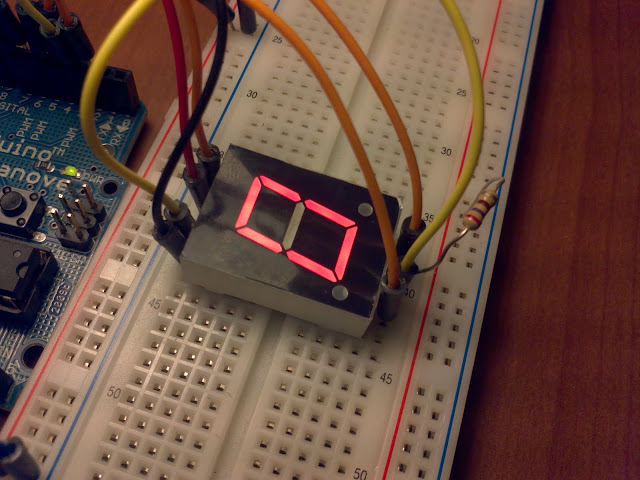
What I built was a seven segment display that will show the number 9 for the maximum distance and a 0 for the minimum distance that the sensor can detect, any other number in between represents any other distance between.
A little Bit of Math
Do you remember the formula y=mx+b, it might seem unbelievable that this will come in handy but it does other-wise our code could turn ugly.
From measuring using the Serial.println command of the Arduino I found out that when an object was the closest possible to the sensor I would get the number 11, the farthest distance would give me the number 512.
I want to display the 9 for 512 and the number 0 for 11 in my 7 segment display, this means that my slope "m" is (9-0)/(512-11)=0.018, and my y-intercept "b" is 0.2. So I end with the following formula.
segmentNumber=0.018*sensorVoltage-0.2
Seven Segment Display Connections
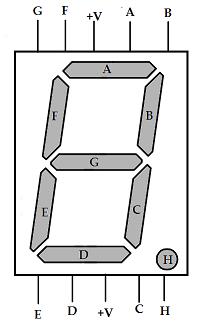
Am using a seven segment LED with the following schematic.

7 segment LED display
I have connected pins A, B, C, D, E, F and G of the display to pins 7, 8, 2, 3, 4, 5 and 6 respectively. I did not use pins 0 and 1 for A and B of the display because those pins are used to program the Arduino.

The power pin is connected to 5V from the Arduino through the resistor.
Ultrasonic Sensor Connections
This sensor has different methods of communication, we will be using the analog method, so we we will only need to connect the ground (GND), voltage (5V) and analog (AN) pins. Check out its datasheet to see what am referring to. Also note that the sensor doesn’t come with pins, you have to buy them and solder them.
In my circuit I have connected the analog pin of the sensor to the analog pin 0 of the arduino.

Ultrasonic sensor connected to 5V, GND and analog pin 0
How To Read Voltage From The Sensor With The Arduino
You might already know this, but if you don’t this is how.
sensorVoltage=analogRead(sensorPin); // the variable sensorPin was given a value of 0 corresponding to the pin am using
The Full Code
In this code am using PORTC and PORTD to refer to pins 0-7 and 8-13 respectively, remember however that am only using pins 2-8.
int sensorPin=0;
double segment=0;
double sensorVoltage=0;

void setup()
{


  pinMode(2,OUTPUT);
  pinMode(3,OUTPUT);
  pinMode(4,OUTPUT);
  pinMode(5,OUTPUT);
  pinMode(6,OUTPUT);
  pinMode(7,OUTPUT);
  pinMode(8,OUTPUT);

  Serial.begin(9600);
}

void sevenSegment(int number)
{


  switch(number)
  {
    case 0:
    PORTD=0b01000000; // 0
    PORTB=0b00000000;
    break;

    case 1:
    PORTD=0b11111000; // 1
    PORTB=0b00000000;
    break;

    case 2:
    PORTD=0b00100100; // 2
    PORTB=0b00000000;
    break;

    case 3:
    PORTD=0b00110000; // 3
    PORTB=0b00000000;
    break;

    case 4:
    PORTD=0b10011000; // 4
    PORTB=0b00000000;
    break;

    case 5:
    PORTD=0b00010010; // 5
    PORTB=0b00000010;
    break;

    case 6:
    PORTD=0b00000010; // 6
    PORTB=0b00000010;
    break;

    case 7:
    PORTD=0b01111000; // 7
    PORTB=0b00000000;
    break;

    case 8:
    PORTD=0b00000000; // 8
    PORTB=0b00000000;
    break;

    case 9:
    PORTD=0b00011000; // 9
    PORTB=0b00000000;
    break;
    default:
    // nothing

  }
}
void loop()
{
   sensorVoltage=analogRead(sensorPin);
   segment=(0.018)*sensorVoltage-(0.2);
   delay(500);
   sevenSegment(segment);
}
The Complete Circuit
This is how your circuit will look like once you have made all the connections.

the complete Arduino proximity sensor
Have fun.
