The seven segment display and arduino
Now that you know how to turn and how to flash on and off an led you are ready to turn on multiple LEDs. More precisely you are ready to make an automatic counter.
For this tutorial you will need a 7 segment indicator. I recommend that you get the one I got.
Circuit Design
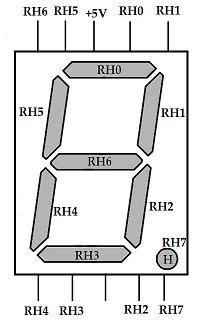
What I have here is a 7 segment led, each of the segments will be controlled by a different pin in the board, we don’t have to use both of the power pins, please note that although I marked the top pin in my circuit with 5 volts I will use the bottom middle pin, you can use either; I have named each segment and connection as in the picture below.

7 segment renamed to match pin numbers I will use
RH0 refers to digital pin 0, RH1 to digital pin 1 , RH2 to digital pin 2 and so on.
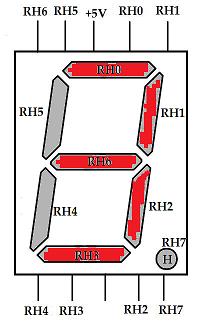
Now the way my circuit will be wired, as you’ll see below in a moment, if I want to display a number I will have to set the pins used by that number to zero. For example if I want to show the number three I will have to set the pins 0 1 2 3 and 6 to zero, all my other pins will be set to one. This might sound contrary to what you think ( 1=off and 0=on ?) and it is for this circuit.

number 3 in 7 segment led, red pins (on) are set to 0 all others (off) to 1
Circuit Wiring
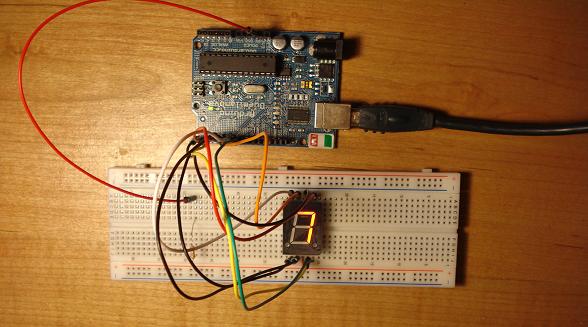
For this part just follow the picture of the 7 segment indicators and connect each pin from the indicator to the pin in the board. The pin in the middle at the bottom will be connected to a resistor (1k in my case) and the 5 volts pin in the board.
Here’s a picture to give you a better idea of how the circuit should look like.

Arduino 7 segment display circuit connections
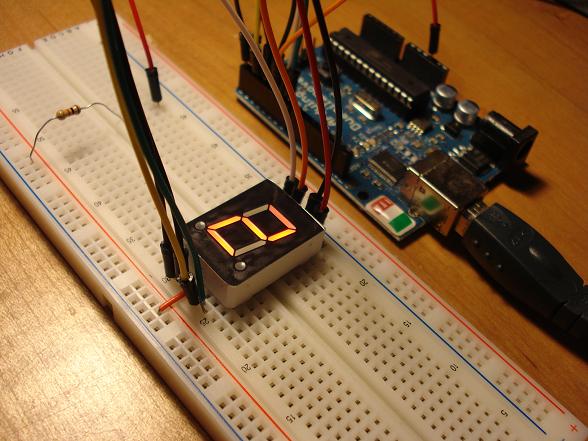
and also a close up of the resistor connection

close up of the resistor to5V power connection
The Software: Everybody Loves Binary Numbers, Or They should
I bet you are thinking about all the typing you are going to have to do in order to set each of the pins to their respective state (on or off) for each number.
Here is what I think you are thinking of typing to say display the number one.
// code that would turn on the number one
digitalWrite(0,HIGH);
digitalWrite(1,LOW);
digitalWrite(2,LOW);
digitalWrite(3,HIGH);
digitalWrite(4,HIGH);
digitalWrite(5,HIGH);
digitalWrite(6,HIGH);
digitalWrite(7,HIGH);
At this point you are probably not as excited as you were when you began reading so I’ll tell you of a little shortcut to do the same thing we did above.
// code that would turn on the number one
PORTD=0b11111001;
Yes that’s right, all that code we did previously replaced by one line. The way this notation works is each number, which can only be zero or one, to the right of 0b represents a pin.
If you start counting from zero from the left of the semicolon you will see that the 1 and 2 place are set to zero and everything else is set to 1, like it should be in order to display the number one.
Here is the full code: ( If you just scrolled down here you missed a really cool shortcut explanation right above ;) )
void setup()
{

  pinMode(0,HIGH);
  pinMode(1,HIGH);
  pinMode(2,HIGH);
  pinMode(3,HIGH);
  pinMode(4,HIGH);
  pinMode(5,HIGH);
  pinMode(6,HIGH);
  pinMode(7,HIGH);
  pinMode(8,LOW);
}

void loop()
{
  		delay(1000);
		PORTD=0b11000000; // 0
		delay(1000);
		PORTD=0b11111001; // 1
		delay(1000);
		PORTD=0b10100100; // 2
		delay(1000);
		PORTD=0b10110000; // 3
		delay(1000);
		PORTD=0b10011001; // 4
		delay(1000);
		PORTD=0b10010010; // 5
		delay(1000);
		PORTD=0b10000010; // 6
		delay(1000);
		PORTD=0b11111000; // 7
		delay(1000);
		PORTD=0b10000000; // 8
		delay(1000);
		PORTD=0b10011000; // 9
}
In my circuit I never want to display the decimal point and so my left most bit, which is pin 7, is always set to 1.
Quick Tip: If You Like Binary Notation You’ll Definitely Love HEX
If you know hexadecimal numbers, which I encourage you to learn if you don’t, you can replace the 0b with 0x and the number to the right with two numbers, for example to show the number 9 the code would be.
PORTD=0x98; // show 9
The Result: Automatic Counter With 1 Second Delay
