Arduino and RGB LED
Why buy a one color LED when you can have an LED that makes all the colors, that’s what Red Green Blue LEDs are for and in this tutorial I will show you how to use them with your Arduino.
The RGB LED I will be using was one that I bought from Sparkfun. I got the diffused one because the clear ones are too bright.
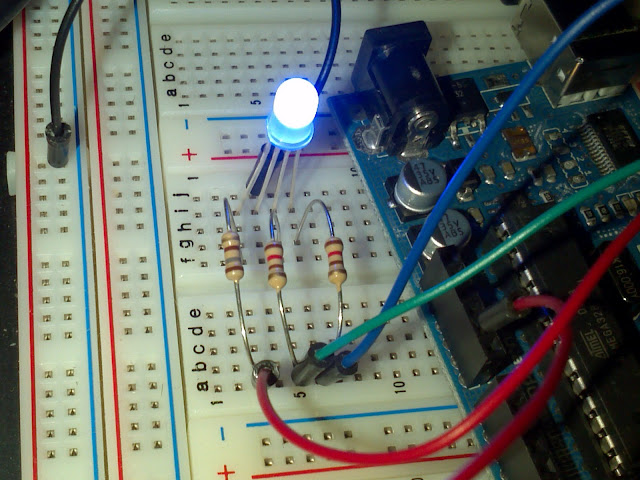
The LED has four pins, the longest pin is ground. The others are the colors red green and blue, I used wires in my circuit with the same color as the pins they are connected too so I think you can figure out the pin out from the circuit or datasheet.
The resistors I used were 180 for red and 120 for green and blue. Don’t use values less than this or you will burn your LED ( you can use 100 for green and blue but red must be 180).

From the left, pins 1,2, 3 and 4 are red, ground, green and blue respectively.
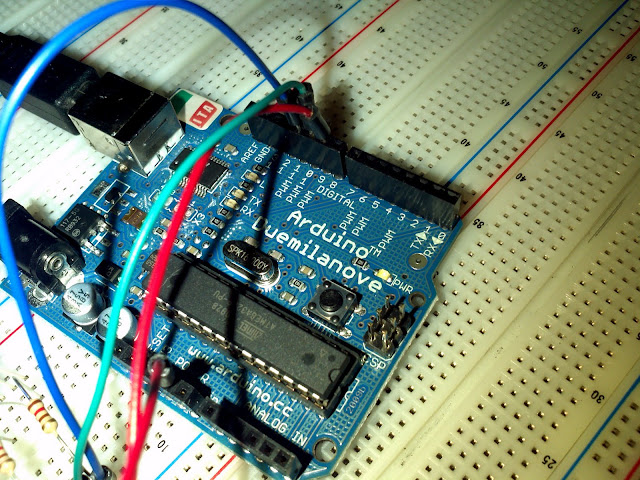
The colors red, green and blue are connected to the PWM pins 9, 10 and 11 respectively. The other red wire is connected from a ground pin in the Arduino to the ground line in my breadboard.

Top three wires, red, green and blue connected to pins 9, 10 and 11 respectively. The red wire below is connected to a groun pin.
The Software
We could use digital outputs, but that would be pretty boring because you wouldn’t be able to get shades of colors that way so let’s use PWM for analog output.
If you are not familiar with PWM (pulse with modulation) I recommend you check out my previous tutorial
Control the Brightness of An LED With PWM From Arduino
Let’s write three programs in one. For what I have in mind we’ll need the following set up.
int red=9,
    green=10,
    blue=11,
    i=0,
    j=0,
    color[]={red, green, blue},  // since array counts start a 0, color[0]=9, color[1]=10, color[2]=11
    intensity[]={0, 0,0}; // one intensity level for each color

void setup()
{
  // set pins as outputs
  pinMode(red,OUTPUT);
  pinMode(green,OUTPUT);
  pinMode(blue,OUTPUT);

  // turn off all colors
  analogWrite(red,0);
  analogWrite(green,0);
  analogWrite(blue,0);
}
Turn Each Color On and Off
This could be done using digital output but let’s use pwm anyways
void loop()
{

  analogWrite(red,255); // turn on red
  delay(1000); // wait a sec
  analogWrite(red,0); // turn off red

  analogWrite(green,255); // turn on green
  delay(1000); // wait a sec
  analogWrite(green,0); // turn off green


  analogWrite(blue,255); // turn on blue
  delay(1000); // wait a sec
  analogWrite(blue,0); // turn off blue

}
You should see the colors red, green and blue turn on and off in that order.
RGB Dimmer
Let’s take advantage of the fact that our color pins are numbered one after the other, that is from 9 to 11 and dim each of the colors in and out.
void loop()
{
  for(i=9;i<=11;i++) // i select the color, 9=red, 10=green, 11=blue
  {
    for(j=0;j<=255;j++) // j sets brightness
    {
     analogWrite(i,j);
     delay(10); // increase brightness every 10 milliseconds
    }
    analogWrite(i,0); // turn off color;
  }
}
Changing To White Color By Color
Now let's increase the brightness of each of the colors, as before, but let's not turn them off so that they overlap. As expected you will get a white LED.
void loop()
{
  for(i=0;i<=2;i++)
  {
    for(j=0;j<=255;j++)
    {
       intensity[i]=j; // the intensity of color i will equal j
       analogWrite(color[i],intensity[i]);
       delay(5);
    }
  }
}
All In One and The Result
Now let's put them all together. Also check out the video below to see the result.
int red=9,
    green=10,
    blue=11,
    i=0,
    j=0,
    color[]={red, green, blue},  // since array counts start a 0, color[0]=9, color[1]=10, color[2]=11
    intensity[]={0, 0,0}; // one for each color

void setup()
{

  pinMode(red,OUTPUT);
  pinMode(green,OUTPUT);
  pinMode(blue,OUTPUT);

  // turn off all colors
  analogWrite(red,0);
  analogWrite(green,0);
  analogWrite(blue,0);
}

void loop()
{

  analogWrite(red,255); // turn on red
  delay(1000); // wait a sec
  analogWrite(red,0); // turn off red

  analogWrite(green,255); // turn on green
  delay(1000); // wait a sec
  analogWrite(green,0); // turn off green


  analogWrite(blue,255); // turn on blue
  delay(1000); // wait a sec
  analogWrite(blue,0); // turn off blue

  for(i=9;i<=11;i++) // i select the color, 9=red, 10=green, 11=blue
  {
    for(j=0;j<=255;j++) // j sets brightness
    {
     analogWrite(i,j);
     delay(10); // increase brightness every 10 milliseconds
    }
    analogWrite(i,0); // turn off color;
  }

  // turn on red then green then blue slowly, by the end you get a white light
  for(i=0;i<=2;i++)
  {
    for(j=0;j<=255;j++)
    {
       intensity[i]=j; // the intensity of color i will equal j
       analogWrite(color[i],intensity[i]);
       delay(5);
    }
  }
}
